

Turkish Stuffed Flatbread (İçli bazlama)
A grilled cheese by any other name would taste as delicious

Given my slight distress and impatience around breadmaking (the rising, the waiting, the fact that I often don’t know what I’m doing, my lack of a stand mixer, the list goes on), it is surprising that I’ve developed a bread recipe. Yet, here we are. A testament to its ease of preparation and wonderful results is that I’ve made this bread, not once, not twice, but 10! times in the past three weeks (successfully, might I add). I hope that tells you everything you need to know.
Good people who read my blog, I would never suggest you spend your time doing something that does not add value to your life. There's something magical about how this bread brightens both your kitchen table and your mood. So, I make a reasonable request: make it one weekend—for yourself or someone special—and see how it transforms an ordinary morning (or any time of day) into something memorable.
My history with Bazlama
My history with this bread is a short but intense one.
It started a few weeks ago when I was making the Turkish Butter-glazed eggs.
That dish demands the company of a bread for soaking up the spiced butter sauce, and I wanted to make a homemade bread because I’m ~extra~. So, I was going to make my favorite Turkish bread called Ramazan pidesi. However, there were a few factors not in my favor:
My success with making Ramazan pidesi has been a 1:2 ratio (hit-miss-miss)
Ramazan pidesi takes about two hours to make, start to finish
We were getting hungry
All that to say, I was open to quicker alternatives. And at that very moment, I saw a suggested recipe with the title “Bazlama - Turkish bread ready in under an hour.” It was like the higher powers were directly answering my wishes!
I also recalled that when I originally tried the Turkish butter-glazed eggs, they were served with bazlama. Ah, why didn’t I think of that before? I don’t know.
So, I carried on my merry way, making bazlama without telling Bulut. And when I presented it to him, I got a gasp “You made BAZLAMA!?” I guess they were pretty good because he ate three in one sitting. No judgement, just flattered.
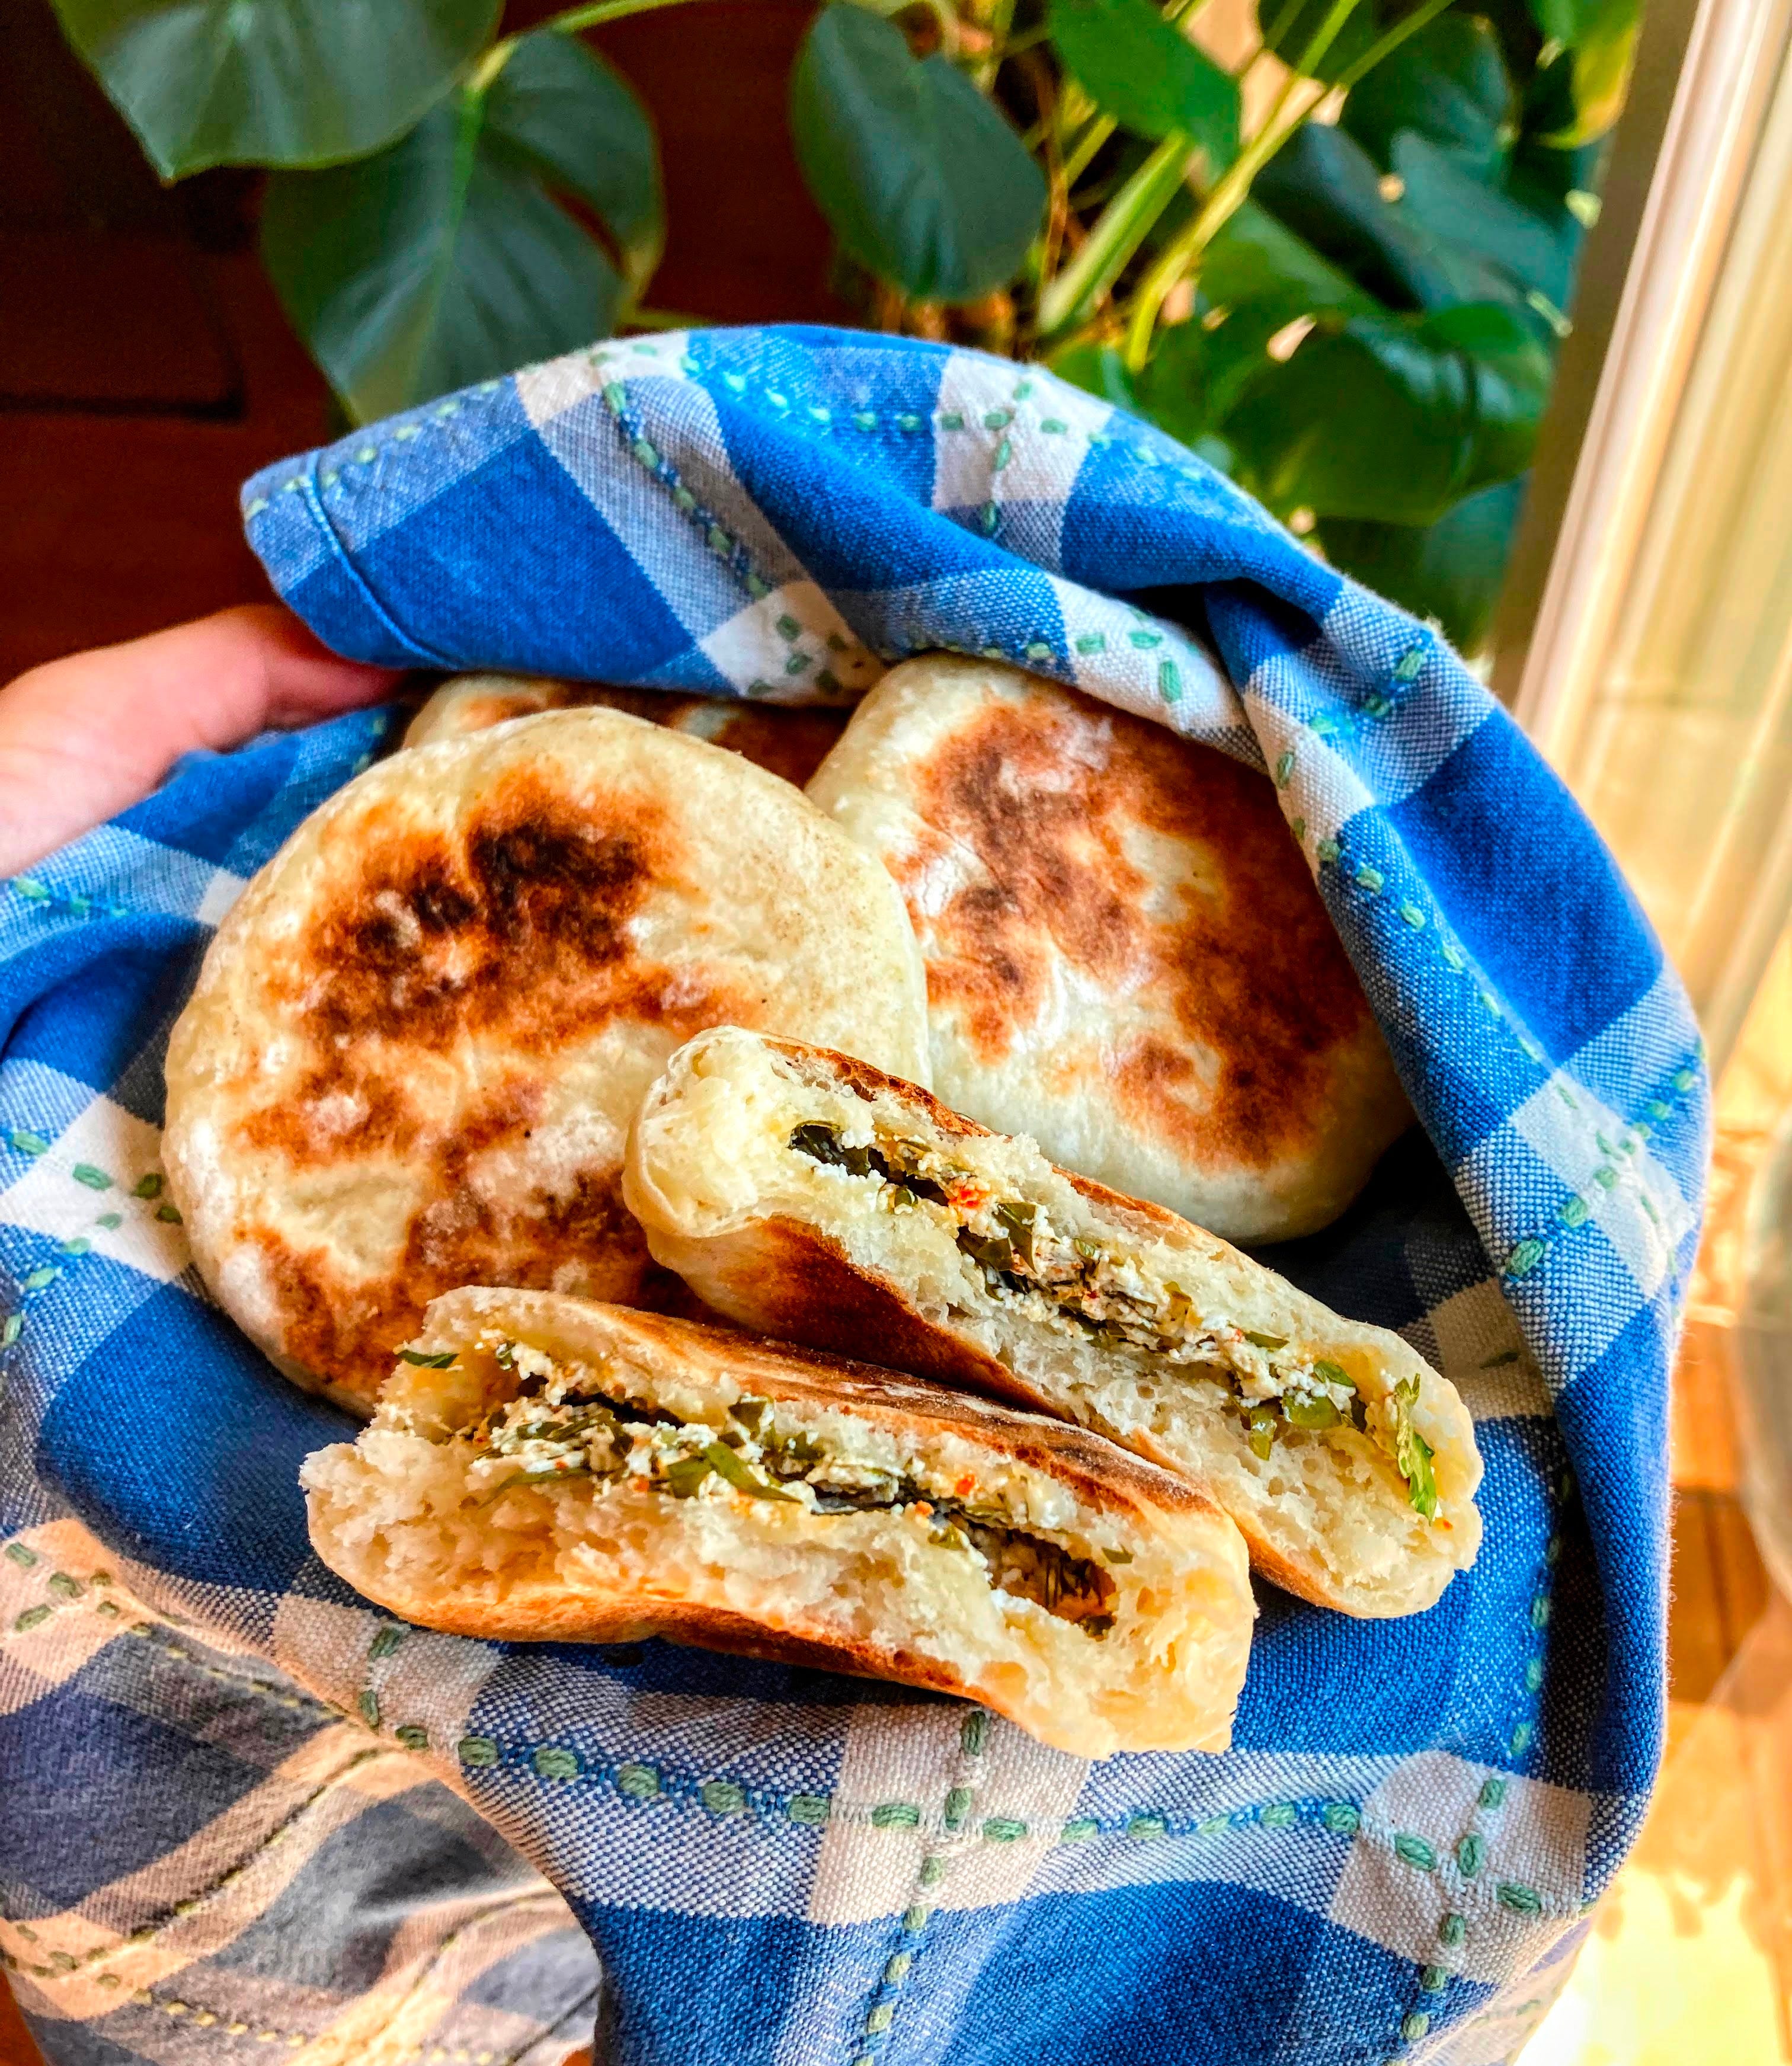
While they look like an English muffin of sorts, that they are not. Bazlama are like a fluffier, softer, better version of pita. A little chewy, just enough for some texture. Flavorful enough on their own that they don’t need extras, but also neutral enough that they can be paired with something sweet or savory. No special equipment needed, no turning on your oven. Just good ol’ bowl, spoon, measuring utensils, a pan, and a stove.
As I started researching more about bazlama, I came across a post on Reddit in which someone mentioned they eat bazlama stuffed with cheese and parsley and dip it in cherry jam.
WOW. Back to work I went. As you can guess, it turned out so fantastic that I had to share it.
Given that I’m pretty green when it comes to bread making, I tested the recipe several times to make sure that it worked and I was not wasting your time. I tried many techniques for dough rising, shaping, stuffing and not stuffing. After all of the testing, I can say that this dough seems pretty foolproof. Also, we did not tire of eating it so much!
If you’re a beginner bread baker, like me, I think this is a good recipe to try out!
To stuff or not to stuff
The first time I made this bread, I did not stuff it. And I loved it.
If you’re dissuaded just by the filling process, let me reassure you— it only takes a few extra minutes to add the cheese. The filling takes the bread from wonderfully rustic to absolutely show-stopping.
If, however, you don’t eat cheese, you can make it without any stuffing (and save yourself a few bucks and a few minutes). That would be classic bazlama, a terrific delight. Speaking of which, you can also use like a pita pocket. After it’s cooked, cut it in half, pry it open, and then make sandwich.
But going back to the stuffing, I think it could be filled with different things, like cooked ground beef, or potatoes (lol carbs on carbs), or maybe even chocolate chips?! If you stuff it with chocolate chips AND potatoes, that would be wild, but it’s your life, and who am I to tell you how to stuff your bazlama?
Final Words
This bread is fantastically remarkable while being suspiciously simple. (Bulut even made the dough last time and agreed that it was easy to put together.)
You mix together the dough at night time — no kneading, no fancy equipment. Just a bowl, a spoon and a cup for measuring the water. (A scale helps, too, but it’s not completely necessary.) In the morning, you start making it, no need to let it come to room temperature.
As an alternative to the overnight cold rise, you can let it rise at room temperature for 45 min-1 hour. And then carry on as outlined.
Another beautiful thing about this bread is that it stays warm and fresh for an hour if you wrap it in a dish cloth or cotton napkin. That gives you more than enough time to whip up some eggs for a full breakfast. Not that it needs a side of anything, but we eat eggs like it’s our religion. We were lucky to not be in the US during the egg shortage earlier this year. We would have become depressed, or bankrupt, or possibly both.
I hope you give this a go! It’s not too technical or difficult. If you have any thoughts or feedback, I’ve love to know in the comments below!
P.S. I made a short video showing the “technique” for shaping and filling the dough.
Stuffed Flatbread Recipe
4 bazlama (2-4 servings) | Total time: 10 minutes for mixing dough, overnight rise, 30-45 minutes for dough shaping & cooking
Ingredients
Dough
1 cup + 2 Tablespoons All-purpose flour (135 g), plus another 1/4 cup for work surface
3/4 teaspoon kosher salt
3/4 teaspoon sugar
1/2 teaspoon instant yeast
3/8 cup warm water (between 90-100 F) (90 g)
30 g plain Greek yogurt (2 level tablespoons) - can be nonfat, full fat, or in between
2 teaspoons olive oil
Filling
2 oz goat cheese
You could use another cheese of your choice! Although, I’ve not tried.
1/2 cup parsley, chopped (this is about 10 sprigs, which yields about 1/4 cup of chopped leaves)
You may substitute with arugula, spinach, or green onions
Very optional: 1/2 tsp Aleppo pepper (because I’m obsessed with it but feel free to skip)
OR fill with whatever your heart desires! You’ll need about 1-1.5 tablespoons per piece of bread, which is ~1/4 cup - 1/3 cup of filling total.
Finishing
Optional: 1 tablespoon butter for brushing at the end
Method
Make the dough: Add flour, salt, sugar, and yeast to medium bowl and mix together well.
Then, add warm water and yogurt (can be cold, right from the fridge), and mix with a wooden spoon or silicone spatula until it forms a rough mass. Scrape it together in the middle of the bowl. Pour olive oil on the dough and rub it all over the top surface using your fingers. Cover with airtight lid or plastic wrap and put it in the fridge overnight.Alternatively, just leave it covered on the counter for 45 minutes-1 hour, until doubled in size.
Remove the dough from the fridge and leave on the counter while you prepare the filling: In another medium bowl, mix together the cheese, chopped parsley, and Aleppo pepper, if using, until well combined. It may seem like too much parsley, but it’s not! Roughly divide into four parts, right in the bowl that you mixed it in.
Prep your work surface: On a clean work surface, sprinkle flour and put another 2-3 tablespoons of flour on the side. Also, have a piece of plastic wrap (about 12 in long) ready to cover the dough with.
This would be a great time watch the video above!Shape the dough: Wet your fingers a little and deflate the dough by releasing it from the sides of the bowl and pulling it toward the center. Rotate the bowl in quarter turns, pulling and folding each time, for a total of 8 quarter turns. This should shape the dough into a rough ball.
Lightly dust your hands and the dough with flour and place the dough on your work surface. Cut the dough ball into four pieces (no need to be perfect).Form the bazlama: Using flour as needed, shape each piece into a ball. I briefly fold the dough under itself, and then gently roll the dough using one hand as a base and the other hand in a cupping shape, moving in a circle. Please see the video above to get a better idea.
Tip: Don’t be shy about using flour. Use a little at a time to keep the dough from sticking to your hands. If it does stick, don’t worry. Gently release the dough and just rub your hands together over a trash/sink to remove the tacky dough. Then, flour your hands again to continue working.
Once you have four balls, cover them with plastic wrap.Stuff and shape: Starting with the first ball, keeping the others covered, place it on a lightly floured area and press it into a round disk, about 5 inches in diameter. [See Note 1 if you are not stuffing it.] Then add one piece of filling and close it up by pinching it together. Again, use a little flour if the dough is sticking to your hands. Shape it back into a ball using one hand as a base and the other hand in a cupping shape, moving in a circle. Then flatten it out again into a disk of about 4 inches in diameter. Put the disk back under the plastic again. Repeat with remaining dough. When done, leave them covered to rise for 10 minutes.
Prepare a dinner plate or large bowl with a clean dish towel to place the cooked bazlama in.Cook the bazlama: Preheat a large skillet (cast iron is great, but other materials work, too) over medium low. Don’t grease the skillet! Add bazlama and cook for 1.5-2 minutes per side, continuing to flip, for a total of 8 minutes.
It’s not an exact science. You’re just looking for the surfaces to have decent browning and for the sides to no longer be tacky.Leave them in the dish towel for at least 5 minutes: After cooking, you may optionally brush the bazlama with butter. Then gently wrap them in a clean dish towel. Leave for at least 5 minutes, and up to an hour. This helps them continue steaming internally and also keeps them warm and soft.
Enjoy! We like to eat it with a tart jam, like sour cherry, cranberry, or raspberry. 🙂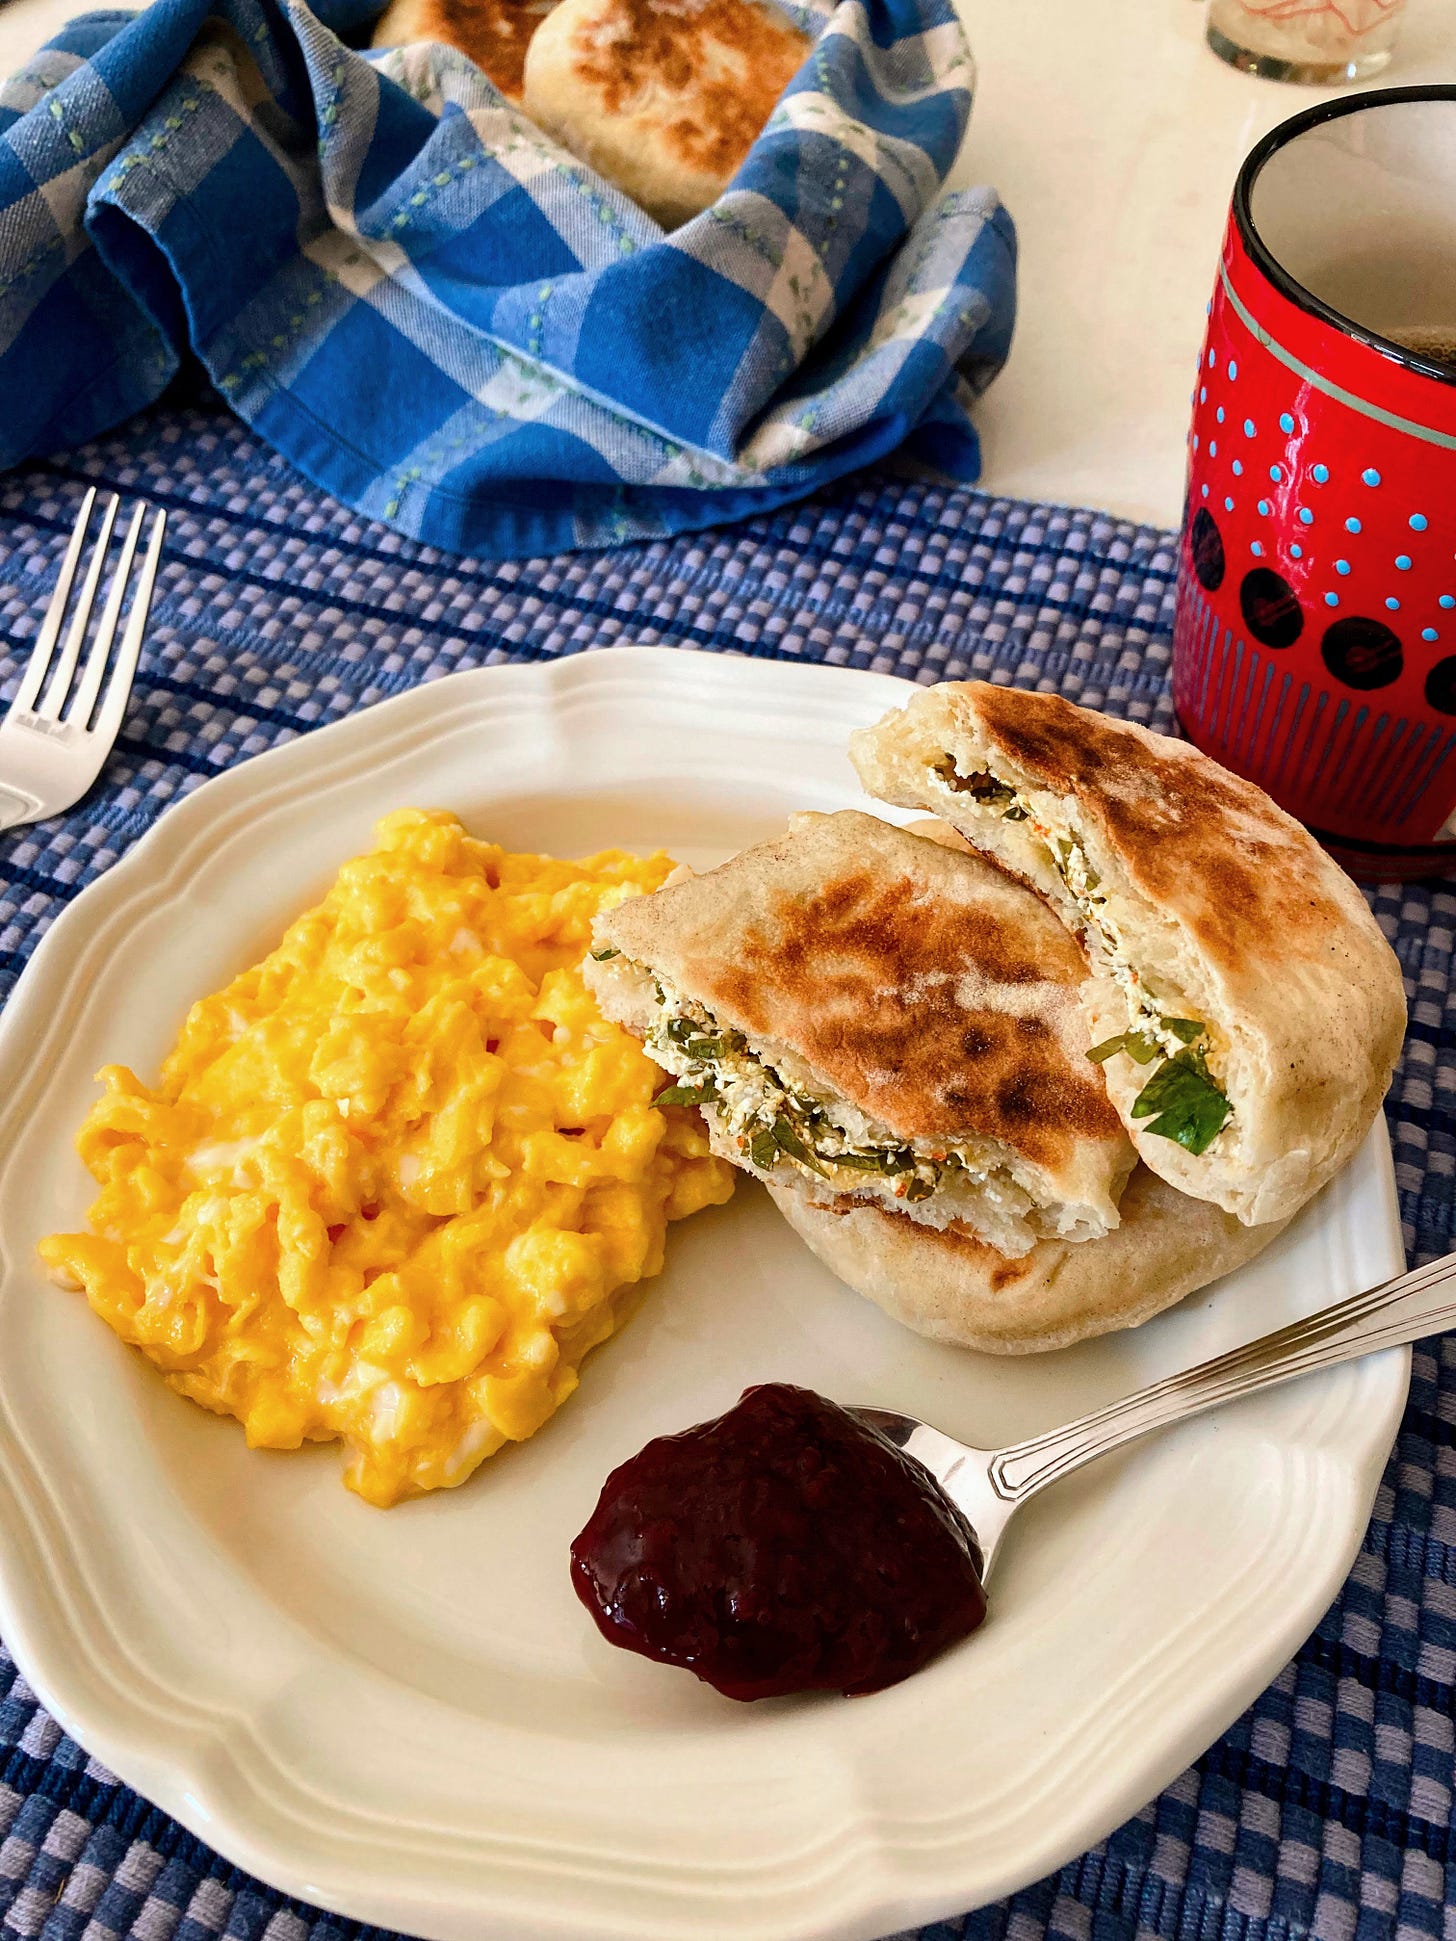

Notes
(1) Non-stuffed version: For step 6, just press each ball into a round disk, about 4 inches in diameter. Then move on to step 7.
(2) Storage & reheating: We almost never store bazlama (because we eat them all 😀), but sometimes I make a double batch and store them in a plastic ziplock bag with as much air removed as possible. Optionally, reheat in a skillet on low heat for 1-2 minutes per side.
(2) Scaling: You can double or triple this recipe! You can also choose to fill half and not the other half. If you double this recipe, you’d be able to use up an entire 4 oz block of goat cheese, yay!
These look so good, Leslie. Plus the method seems totally doable.
Leslie this is a fabulous post, your rolls looks so yummy and easy enough for anyone to try. I’m going to make them in your honour as soon as I get some yoghurt.